Understanding Prompt To Prompt for Editing Images using Diffusion Models with the Source Code Part 1

Motivation
I started doing research at my University on Diffusion models for doing dream booth/textual inversion without training(will share the results once I publish a paper!). And this paper by google came up a lot. So I thought this blog post will be a good opportunity for me to explain and understand how Prompt to Prompt by google works. The paper is “Prompt-to-Prompt Image Editing with Cross Attention Control”.
I’ll try explaining it in a way for the general audience will get it. I’ll also be looking at code from their official repo here
Background
Diffusion Models
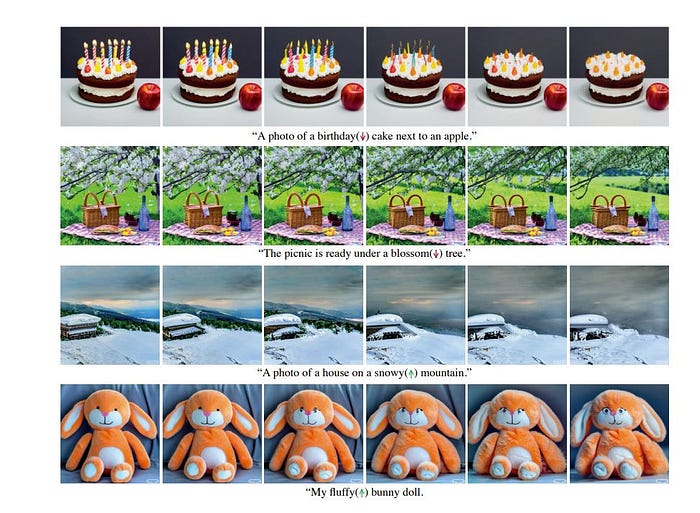
These are a class of models where you keep adding noise iteratively until we generate a nice image. This is what stable diffusion, Dalle, and so on are based on, and can generate beautiful images like those below just from text. Feel free to check out this series if you are interested in the in-depth explanation of how these models work

Inpainting
In the previous approaches, the main way to edit images was by inpainting

The main idea for this approach is you cover up the region you want to edit in a mask, then you add input text saying what kind of edit you want, and finally, a result comes out.
While this is pretty decent, one idea the google team was given is that we have an image that we generated, can’t we just change the prompt we used to output a newly edited image?
Prompt to Prompt
When text works with the diffusion model, the way they are inputted into the diffusion model is by cross-attention. The main idea is when working with the transformers, which are models that pay attention to parts of the image and decide how much noise to add, we also keep reminding it of what text features we had.
The specific way is shown below.

We pay attention to parts of an image using 3 matrices called Q, K, and V which stand for query, key, and value. Then
- We multiply together Q and K to get a shape that is the same as V. We also do a softmax. A softmax ensures that the sum of all the elements is 1. So, it prioritizes only the important parts of V.
- We multiply with V to get the output Z which are the parts of V we are paying attention to.
Now, for cross-attention,

The K and V we get from the text features. And the query is the current noisy image. So we are choosing which parts of the text to pay attention to in the attention maps we see in the figure above.
Now, the idea of the paper is since we already have the attention maps from generating the image before, when we are changing prompts, why don’t we directly swap parts of the attention map with the new one based on how the prompt was edited?

Now, one important point to note here is that there is a mask that corresponds to every token in the text encoding layer. And yes we aren’t inputting direct text. We are passing the text through a text encoder the giving it as input for the cross attention. The text encoder that is typically used is a CLIP text encoder
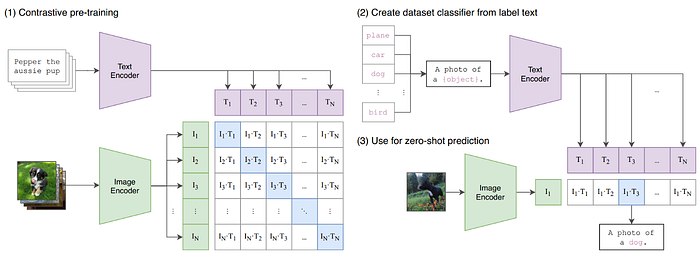
which TLDR, figures out the best features from the text that represent an image.
So now, one question is how do we choose which mask to swap since we don’t know if the location of the nth token corresponds to the nth mask?
For this paper, it seems like they just got the nth mask for the nth token. But I’ll just say that that is not necessarily true based on what text encoder you use. In this case, the CLIP text encoder has a relatively good property where you can assume a certain relationship between the nth token and the nth mask. In particular, the nth token has a relationship with all the tokens behind it. Ask me in the comments if you are interested in why!
However, naively replacing the nth token of the original attention map with the nth attention map of the new prompt feels a bit of a stretch. I am curious so I’ll probably test this out and put the results here.
Though it turns out they do it a more clever way!
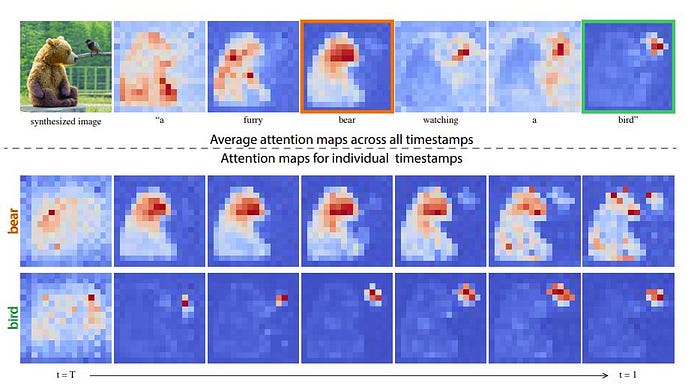
Another interesting fact they discovered was that the average cross-attention map seems to pick up on what we want to describe from a very early timestep when doing diffusion. Diffusion usually takes many timesteps of adding noise so it’s interesting that the idea of the scene is basically made from time 0
Now, for the pseudo code!

This process does 2 diffusion processes at the same time. One for the original text image and one for the edited version. The steps are as follows
- Since we don’t want much randomness causing chaos between the image we are editing, we are fixing the seed. I am interested in how unfixing this will change the results. Will test it and put it here!
- Next, we pass our original text and get the attention map and the non-edited noisy image.
- We then get the attention maps for our new prompt given the edited-noisy image(notice that this is a different noisy image variable) and our edited prompt
- We pass the edited cross-attention map along with the non-edited cross-attention map and composed them using an edit function to get a new cross-attention map
- Get the denoised edited noisy image
Now our main mystery here is now just what is the Edit function doing. For this, it mainly depends on the kind of editing we want to do
Swapping words
Now, I initially thought that if we want to say swap “A photo of a cat on a bicycle” with “A photo of a cat on a car” we will replace the cross attention map of the bicycle with a car. However, they do a rather interesting way of

Where before a certain timestep the edited attention map is used and after that, only the original attention map is used. The authors argued that this is to preserve the original composition while also addressing the content of the new prompt. The results are as follows

Which is honestly pretty impressive.
Adding New Phrases
This is an example where we aren’t replacing words but we want to add new descriptors like “A castle next to a river” to “A children’s drawing of a castle next to a river”. To do this, you may have guessed already, but we do not want to touch the original attention map. Instead, we add the attention maps of the new prompt only when there is no overlap. This can be seen as follows:

Where A(j) says if there is a token there already. Now the results of this is pretty amazing too.
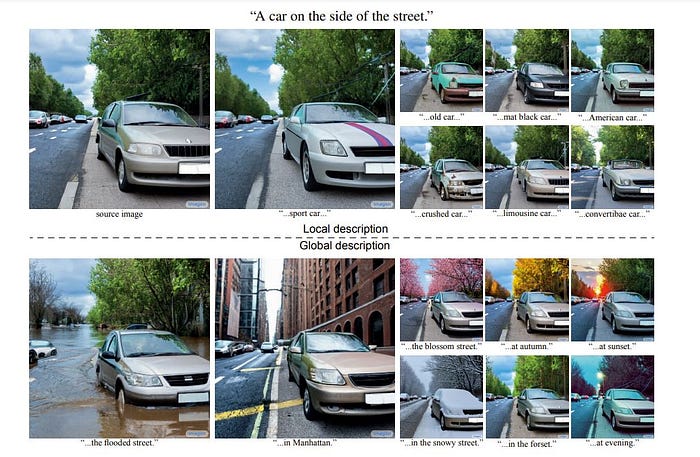
Attention Re-weighting
This is one of the more interesting ideas shown. What if we want to strengthen a certain concept? Why don’t we strengthen or weaken that token by multiplying by a number? This is exactly what the team at google came up with!

Now the attention maps were computed from the softmax so honestly below is undefined behavior and is recommended to be kept around -2 to 2 according to the paper. Here are the results!
Editing Real Images
Now that we know how we can edit images that we generated, how about editing real images? Here we introduce this paper called “Null-text Inversion for Editing Real Images using Guided Diffusion Models” which is by the same people as the prompt-to-prompt paper.
The main ideas they had were
- If the current image is a real image then why don’t we figure out a way to generate this real image?
- If we are inverting the image already, why don’t we also invert the tokens in the unconditional setting? From how classifier-free guidance works, this allows the tokens to say what kind of image we don’t want the model to generate. This is called negative prompts.
Another reason for 2 is so that after inversion, it won’t affect the prompt to prompt editing below.
DDIM
Now, to talk about DDIMs(introduced in this paper), let’s first talk about how they are different from regular diffusion models. So, for regular models, we go through what is called a reverse process to reverse the noise added to an image

We choose a mean and standard deviation and randomly sample from there to get the image denoised by one step. The main change for DDIMs, from my understanding, is that we just do a regular diffusion but we do not sample from the distribution and we just keep choosing the mean.
In their paper, they described it as follows:

Here, for certain σ, standard deviations, this becomes a regular diffusion process but the closer we move to 0, this process becomes deterministic.
This deterministic nature allows us to invert an image from x₀ to the latent space. So we can now encode and decode images!
Now, we can just invert the real image, then just do the cross-attention prompt to prompt right? Technically yes but this leads to poor results. I have tried it out myself and if the image is a unique image of a subject, there tend to be a lot of errors when regenerating it. To solve this, the authors came up with the approach of using pivotal tuning!
Why is there an error
To reason, the error occurs appears mentioned to be DDIM inversions work well in the unconditional case, but not for text-guided conditions since we are doing classifier-free guidance which increases error.
I mentioned classifier-free guidance in this article but it’s mainly a technique that adds conditional noise to unconditional noise like below where
predicted noise = unconditional noise + guidance factor(conditioned noise -unconditioned noise)
This technique is a bit of a hack with mainly intuition-based math behind it. Also, we typically have the guidance factor be around 7.5 which tends to give good results but is very undefined behavior math-wise.
In practice, DDIMs are not great at encoding latent from a text and an image even when we specify the guidance factor. However, it’s not too bad of a starting point too.

Pivotal Tuning
The idea for pivotal tuning was introduced in this paper for GANs. The idea they had was if we want to edit real images, just inverting it into the latent space has a lot of deforms so next, we directly certain parts of the model so that we get better results.
In the context of null textual inversion, the two questions are
- What should be our training objective so that we get perfect inversion?
- What part of the model should we tune?
To answer both of these questions, the authors gave us a nice figure
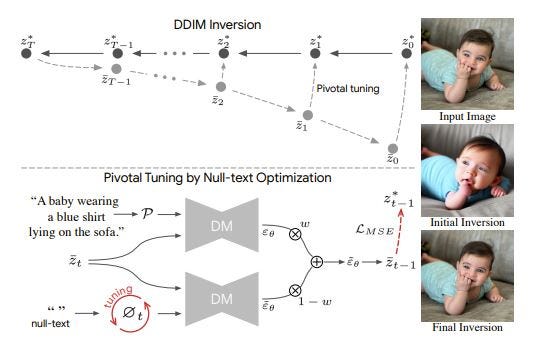
For 1, what we observe is that for every step of the diffusion model’s generation, there is a difference between the noisy image which we observed when inverting and the noisy image that the model actually made in time step t. Our objective is to minimize this difference since if we have the difference here be 0 for all noisy images, we get a perfect recreation. One tiny point here is that in the paper, for the inversion they used guidance scale 1 which will just be fully conditional noise while for the tuning, it allowed any guidance scale.
Now, for 2, we do not want to train the entire model in order to minimize this loss because that’ll be very unscalable and will need a lot of GPU memory. What we instead can do is we can add a null token/unconditional tokens which we finetune so that it represents exactly what we do not want in the images. In the paper, they also got the idea of having a null text for each timestep in the diffusion process which is pretty clever. Basically, we tell that model what we want based on what we have so far! And then we have a perfect inversion!
Source code
Now, for the source code, I’ll cover it in part 2.